
Disclosure: This Disney Cricut Christmas Countdown post contains affiliate links. Read full Disclosure Policy.
‘Tis the season and I am JOLLY, my friends! I look forward to Christmas time all year long! And the only people I know that look forward to it more are my children.
But here’s where we struggle a little bit…
My daughters are too young to really grasp the concept of time passing. Two days might as well equal an eternity to them… and I get it. Sometimes it takes FOREVER for fun things to come. You know, like Disney trips and holidays!
A fun (and crafty) solution I have come up with is making a countdown that my kids can have as a visual representation of the time that is left.
And it has saved my sanity from being asked 17 times a day, “Is it time to go to _______ yet?”
At our house, we make countdowns for trips, holidays, birthdays, visits from Grandma, etc. You name it, we count down to it!
So this Disney Christmas Countdown is a project for the young (and the young at heart)! It is practical, adorable, and OH SO EASY! Let’s get to it!
BEFORE YOU DO ANYTHING, WATCH THIS…
GETTING STARTED
One of my favorite Cricut accessories and supplies to use is removable vinyl for things like chalkboards because it is, well, REMOVABLE!
That means that when I change my mind about what I want on it, I can do that without having to buy a whole new thing.
You can also use permanent vinyl for this project and it will turn out great. It’s just a matter of what you prefer!
Supplies Needed
- Cricut Maker
- Light or StandardGrip cutting mat
- Chalkboard (I used this one which is DOUBLE-SIDED and awesome)
- Removable vinyl in white, red, dark green, and light green
- Transfer tape
- Weeding tool
- Scraper
- Chalk or chalk marker
Skill level: Beginner
Time Estimate: 40-50 minutes
CUSTOMIZE IT IN CRICUT
- Click HERE to open our Cricut Design Space project template in your browser.
- NOTE: This project contains 3 licensed images and 3 fonts that are found within Cricut Design Space. All but one is included in a Cricut Access membership. You will be prompted to purchase any images/fonts you do not already have own or access to for a couple of dollars, when you CUT your design.
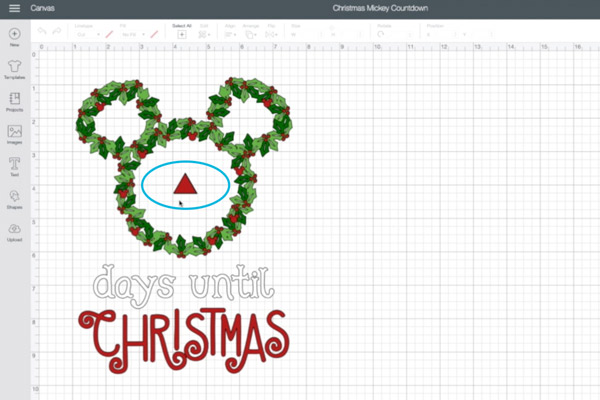
- Adjust the SIZE or COLOR of the design, if you like. Make sure you adjust the size of all layers at the same time, so they will align properly!
CUT IT
- Turn your Cricut Maker on.
- Place your removable vinyl onto your mat (right side up), aligning it with the grid. The backing should be DOWN.
- Load your mat (The cut-out arrow goes in first).
- Click MAKE IT at the top right of your screen.
- Choose VINYL for your MATERIAL.

- Verify your Fine Point Blade and mat are loaded correctly.
- Press the GO button on your Cricut Maker.
- Watch the magic happen!
- When the Maker is finished and the Load/Unload button blinks, UNLOAD your mat.
- Repeat STEPS 1-9 for all 4 colors of vinyl.
MAKE IT
- Use your Weeder tool to remove the vinyl that is not part of your design.
- TIP: the Cricut Bright Pad makes seeing delicate cut lines SO easy!
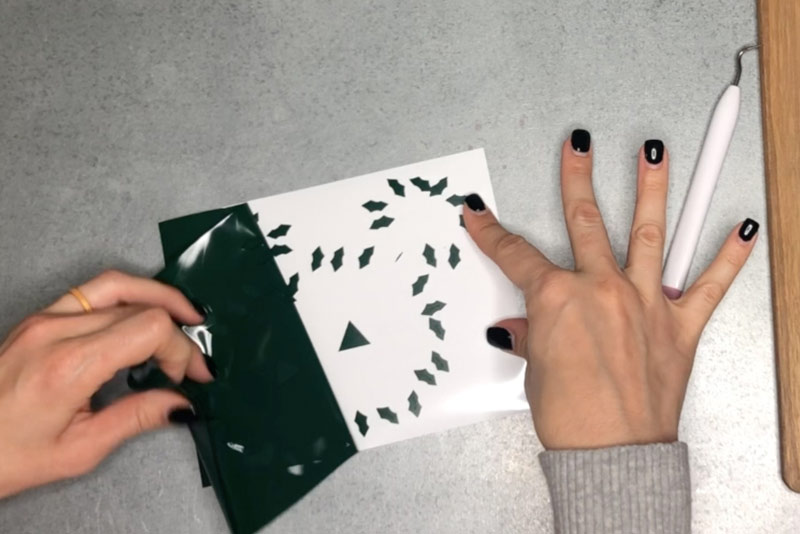
- Cut a piece of TRANSFER TAPE slightly larger than your weeded vinyl pieces, but small enough that it can fit on the surface of your chaklboard.
- Peel the backing off of your clear transfer tape. Place it on your work surface, sticky side up.
- Lay your FIRST layer of vinyl (the red), RIGHT SIDE DOWN, on the transfer tape. Use your SCRAPER to press it firmly into the transfer tape.
- NOTE: It is important that you put the layers of vinyl down on your transfer tape in front-to-back order. So RED, then DARK GREEN, then LIGHT GREEN, and lastly WHITE.
- Peel the BACKING off of your vinyl.
- Lay your SECOND layer of vinyl face up on your work surface.
- Lightly fold the red vinyl/transfer tape in half (sticky sides away from each other), without forming a crease.
- Align your transfer tape/vinyl to your second layer of vinyl using the triangle as a guide. If it is aligned, the entire design will be.
- Use your SCRAPER to firmly adhere the design to the transfer tape. Then peel the BACKING off of your layer of vinyl.
- REPEAT STEPS 6-9 for your remaining vinyl layers.
- When all the layers are stacked and aligned on your transfer tape, remove the triangle from the design.

- Place your design centered on your CHALKBOARD.
- Smooth your design from the inside out, using your finger and then a scraper.
- Slowly peel back the transfer tape, pressing your vinyl into your chalkboard as you go.
- TIP: Keep the transfer tape pulled flat against your chalkboard to avoid pulling up the vinyl. GO SLOWLY and be patient!
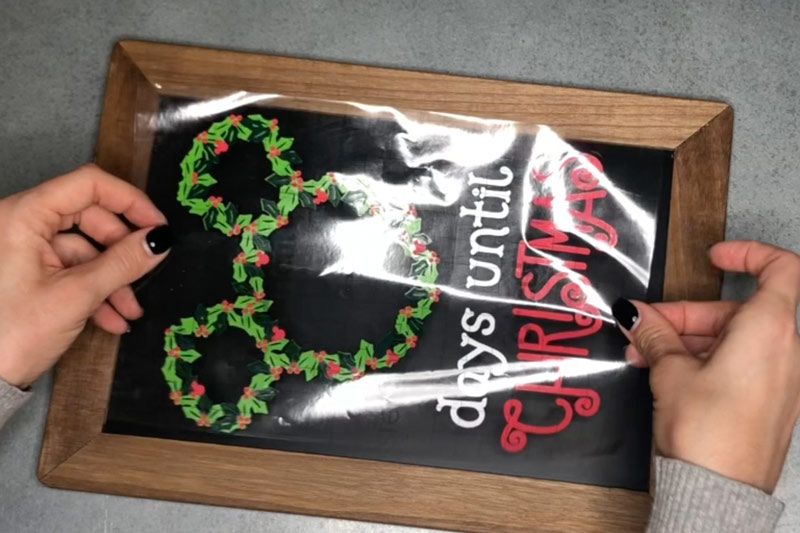
- Use your finger and/or scraper to smooth your vinyl.
LOVE IT
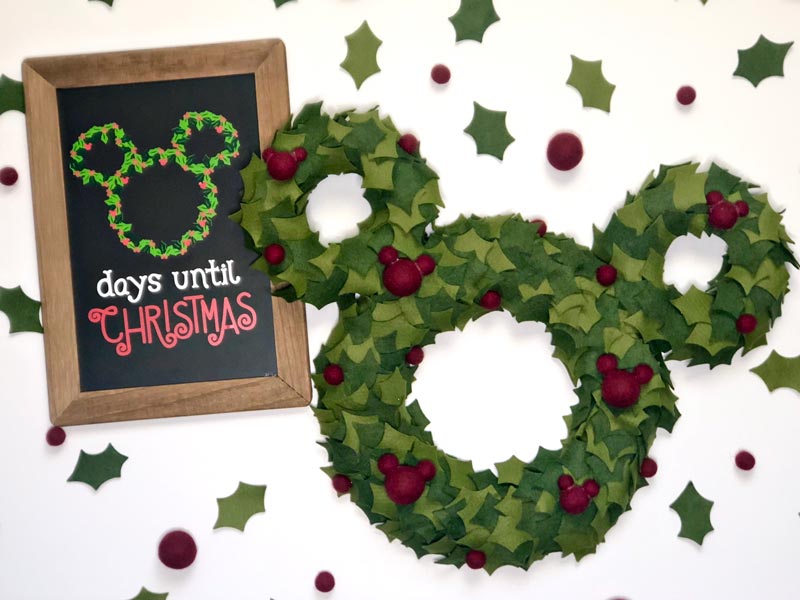
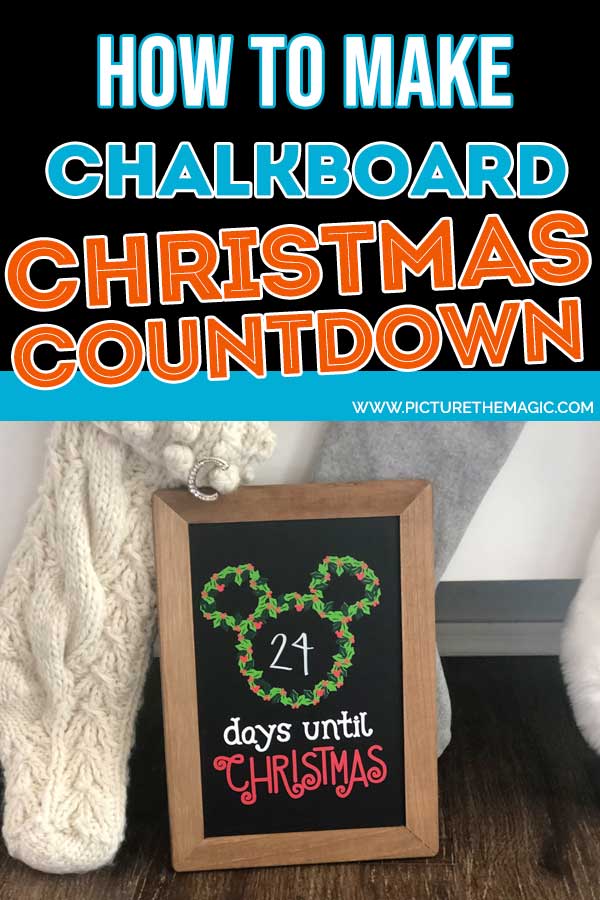
Use a piece of chalk or a chalk marker to write your Christmas countdown on your board.
To remove the numbers, simply wipe with a slightly damp lint-free cloth.
Do NOT soak your chalkboard, and try to avoid getting the vinyl itself wet.
We cannot wait to see the Christmas countdown chalkboards you make! Share your design with us using #picturethemagic for a chance to be featured on our instagram!
Can’t get enough of Mickey heads made out of holly? Neither can I! Check out our Mickey Mouse Wreath Tutorial for another super easy craft!
Pin For Later
This is darling!! Thanks so much for sharing!! The video is great information!
Thanks Debbie! So glad you like it!
I’m so glad!