This is a sponsored conversation written by me on behalf of Cricut. The opinions and text are all mine.
Disclosure: This Cricut shirt maker post contains affiliate links. Read full Disclosure Policy.
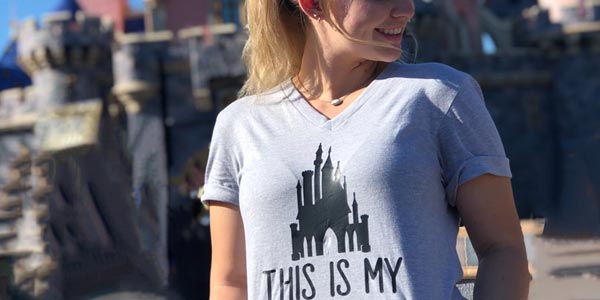
I am SO excited to share with you Part 3 of our Cricut For Beginners project series!Today, I will walk you through a Cricut Iron-On Vinyl tutorial — How to Make a Disney T-Shirt!
Maybe you have already used your Cricut to make shirts, or maybe you are a first time Cricut shirt maker. Whatever your level of comfort and experience making shirts with Cricut, we feel confident that the Maker is the best Cricut for making shirts!
Note: these Cricut instructions will work to make any t-shirt (not just Disney).

This project is my favorite of our Disney Cricut Projects series because we get to use Iron-On Vinyl!
Iron-On Vinyl is my accessory of choice for 90% of my Cricut Projects. I love the freedom to make (or customize) shirts, bags, sweatshirts, leggings, backpacks, drink koozies, and even the covers for my kids’ Boogie Board writing tablets– the list goes on and on!
If You’re Just Joining Us…
If you are just joining us, we are using ONE purchased image that cost less than TWO dollars to create THREE fun and easy projects on our Cricut Maker. We guide you through each project with step-by-step written instructions and a detailed video tutorial!
SEE THE OTHER TWO PROJECTS
Now…let’s become a Cricut shirt maker! Here we go…
Table Of Contents
- Video Overview: Watch this First
- All About Iron-On Vinyl
- Household Iron vs. Heat Press
- Heat & Timing Settings
- Getting Started
- Creating Your Design
- Cutting Your Design
- Applying Your Design
- Care Instructions
- More Iron-on Projects
Video Overview: Watch this First!
All About Iron-On Vinyl
What is Iron-On Vinyl?
Iron-On vinyl is vinyl that adheres to fabric and other porous materials through the use of heat. Another name for Iron-On vinyl is Heat Transfer Vinyl, or HTV for short!
There are 2 basic elements for the proper application of Iron-On Vinyl: consistent temperature and pressure.
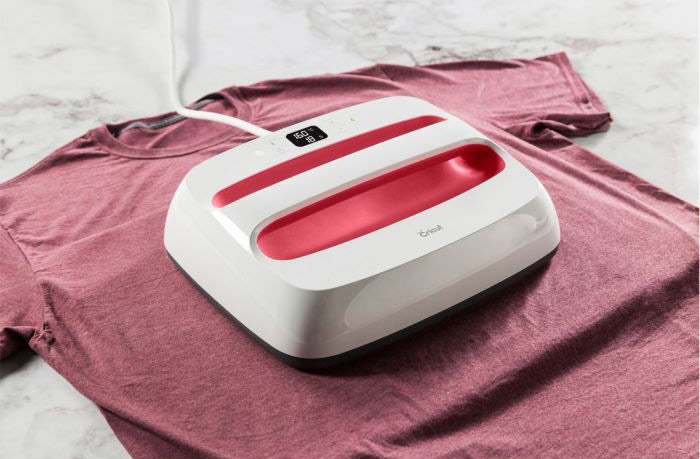
The best way to apply Iron-On Vinyl is with the Cricut EasyPress 2. This top-of-the-line machine gives you flawless transfers with lasting results in 60 seconds or less! And it comes in 2 colors (mint and raspberry) and 3 different sizes as well: 6” x 7”, 9” x 9”, and “12” x 10”.
Where can I buy Iron-On Vinyl?
Cricut has a massive selection of Iron-On vinyl, available in many different finishes. You can find it directly on their website, in craft stores like JoAnn, Michaels, and Hobby Lobby, and even on Amazon.
We also like using Siser EasyWeed HTV (Heat Transfer Vinyl) if Cricut’s Everyday Iron-On is ever out of stock!
Household Iron vs. Heat Press
Can I use my household iron?
Many crafters use their household irons to apply Iron-On Vinyl.
I did, for a long time! And it works… mostly.
If you do not have or cannot afford a heat press (like the Cricut EasyPress 2), your household iron will allow you to successfully create projects with Iron-On Vinyl! It will just be a bit trickier to get the right results! But yes, you can use your household iron…
Consistent Temperature
Household irons don’t maintain one temperature for the entire time they are plugged in.
Instead, they cycle.
The temperature starts low and then raises until it hits the appropriate range for the fabric type you selected. It then stops creating more heat and cools slightly, and then raises the temperature again.
This inconsistency can cause your vinyl to warp or overheat, or possibly not even stick to the fabric if a high enough temperature was never reached.
Pressure
Firm, downward pressure is important to make sure that Iron-On Vinyl adheres properly to the fabric you are putting it on.
- Don’t press hard enough? It might not stick well.
- Apply inconsistent pressure? It might bubble or ripple.
The EasyPress 2 is heavier than a household iron. Because it is appropriately weighted, you don’t have to bear down with all your might just to get the right pressure setting.
It does all the hard work for you, allowing you to just lightly press down while applying your vinyl.
How do you apply enough pressure, if you must use a household iron?
- Apply your vinyl on a hard surface, like a countertop or table. Don’t apply vinyl on your ironing board. It’s cushioned and relatively flimsy… which won’t work for this!
- Always protect your work surface from the heat by placing a towel, teflon sheet, or EasyPress 2 Mat under your materials.
- Press DOWNWARD into your design. You are not smoothing away wrinkles from a linen dress shirt. You are trying to mimic the effect of a professional heat press using a lightweight iron. Act like it! Press firmly and consistently for the duration of the heating period.
Heat & Timing Settings
How long do I press my Iron-On Vinyl? How hot should my iron be?
Cricut has our backs, you guys! They take all the guesswork out of this and have made it so simple.
Printed on the back of the label of EVERY SINGLE ROLL of Iron-On Vinyl produced by Cricut are instructions specific to that product.
Different types of vinyl need to be heated at different temperatures and for different lengths of time — AND the plastic liner needs to be peeled off at varying levels of warmth as well… so it’s awesome to be able to refer to those instructions!
But what if you aren’t using a brand new roll of vinyl and already threw away the label? Never fear! I also have your back! Here’s a quick reference chart you can PIN (and print!) to keep handy.
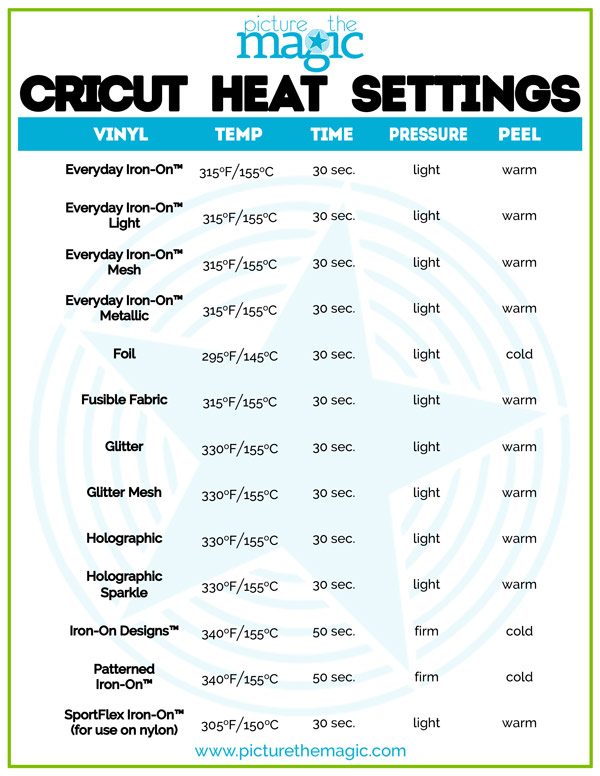
Note: If you are applying Iron-On vinyl to a material other than a tshirt or sweatshirt, check out Cricut’s complete Heat Guide.
Armed with all that useful knowledge, you are ready to make a shirt!
Getting Started: Cricut Shirt Making
Supplies Needed to Make a Disney Shirt with Cricut Maker
- Cricut Maker
- Black Iron-On vinyl
- Cricut Basic Tool set
- Light or Standard Grip Mat
- Fine Point Blade
- EasyPress 2
- EasyPress 2 Mat
- Paper trimmer
- A t-shirt (my favorite…love the fit and the material)
- Cricut BrightPad (optional)
- Iron (optional – if you don’t have an EasyPress 2)
- Towel or teflon sheet (optional – if you don’t have an EasyPress 2 Mat)
Skill level: Beginner
Time Estimate: 30-40 minutes
Prep Work: For best results, wash and dry your t-shirt BEFORE applying your vinyl. This will help prevent any warping if your shirt were to shrink after the vinyl was applied!
Creating Your Design
STEP 1: Open Cricut Design Space on your browser.
On the left hand side, open a NEW PROJECT.
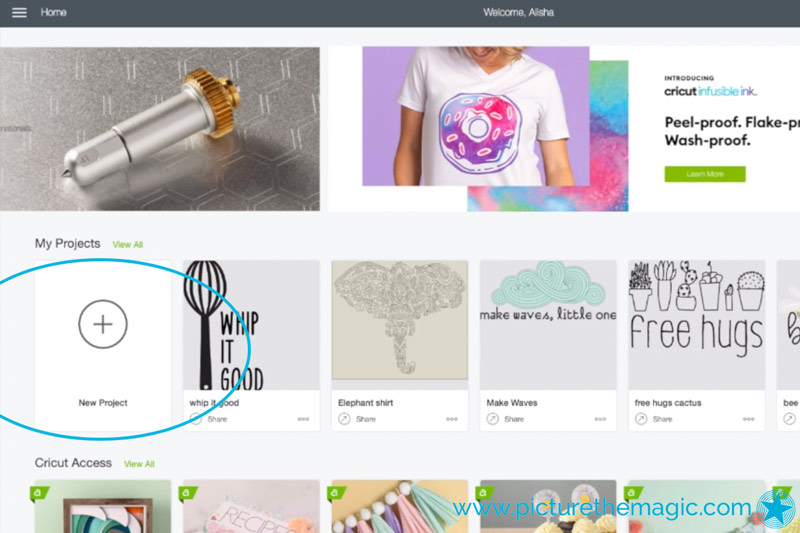
STEP 2: ADD YOUR IMAGE
Click IMAGES and then CATEGORIES.
Scroll down to select DISNEY.
Search for “castle.”
Select the castle of your choice, then select INSERT IMAGES.
Change the COLOR to black.

Use the CONTOUR button to select any cuts you don’t want included in your image.
Once all unwanted cuts are selected, click HIDE ALL CONTOURS.

STEP 3: ADD YOUR TEXT
Click TEXT to create a text box.
Change the font by selecting the drop-down FONT menu and search for the font of your choice. We used “Four Seasons Home Decor.” Select your desired font. (If you want Disney fonts, we have those here.)
TYPE in your text. We wrote: “This is my happy place.”

Adjust the Letter Space and Line Space as needed. We chose “.7” for the Letter Space and “-2” for the Line Space.
UNLOCK the proportion control for the width and height of your TEXT. Make the width of your text 10” WIDE. Make the height 4.2” TALL.
Change the height of the CASTLE to 4” TALL, leaving the proportion control locked, so the width will adjust automatically.
STEP 4: ALIGN & ATTACH
Zoom out, if necessary, to see your entire image.
Select both CASTLE and TEXT layers. ALIGN them centered horizontally.
Make sure that the total size of your design does not exceed 11.5” x 11.5”.
ATTACH your layers together.

Cutting Your Design
STEP 1:
Place your Iron-On vinyl onto your mat, aligning it with the grid. The glossy side goes DOWN.
STEP 2:
Make sure your Fine Point Blade is in the machine.
STEP 3:
Turn your Cricut Maker on.
STEP 4:
Load your mat (The cut-out arrow goes in first).
STEP 5:
Click MAKE IT at the top right of your screen.
STEP 6:
CHECK the “MIRROR” option. (Iron-On is cut on the wrong side of the vinyl so it will look correct when adhered to your material).

STEP 7:
Choose EVERYDAY IRON-ON for your MATERIAL.
STEP 8:
Verify your blade and mat are loaded correctly.
STEP 9:
Press the GO button on your Cricut Maker.
STEP 10:
Watch the magic happen! When the Maker is finished and the Load/Unload button blinks, UNLOAD your mat.
Applying Your Design
STEP 1:
Use your Weeder tool to remove the vinyl that is not part of your design.
TIP: the Cricut Bright Pad makes seeing delicate cut lines SO easy!

STEP 2:
Plug in your Cricut EasyPress 2 and turn it ON. (Use our handy, printable chart to confirm the proper heat and time settings for your project.) Set the time and temperature accordingly. The GO button will glow orange, showing you that the machine is preheating.
STEP 3:
Make sure your surface is firm and flat — NOT and ironing board or carpeted floor. Protect your surface with the EasyPress 2 mat (or a teflon sheet or towel, if you do not have one).
STEP 4:
When your machine beeps and the GO button changes from orange to green, it is ready to use!
STEP 5:
Preheat your t-shirt for 5 seconds to remove any moisture and wrinkles! This step is super important!
STEP 6:
Position your vinyl design where you want it to go on your shirt, and make sure the shiny liner side is up… Check it… then double check it!
STEP 7:
Place the EasyPress 2 on top of your vinyl. Start the timer by pushing to GO button. Apply gentle pressure to the EasyPress 2 and hold it still while it does it’s job!
TIP: If you design is bigger than your EasyPress 2, you may need to do this in sections. Try not to overlap, if possible, to avoid melting the vinyl.

STEP 8:
Flip your t-shirt over and apply the EasyPress 2 for about 15 seconds. This will help make sure that the design hold up to inevitable wear and tear.
STEP 9:
Depending on your choice of Iron-On Vinyl, you will need to remove the liner when it is warm or cold. Check our chart to make sure you do it correctly!
STEP 10:
Wait a minute or so, until the liner is cool enough to handle (and the proper temperature for removal) and gently peel it back, away from the shirt.
TIP: If the liner doesn’t lift easily, reheat the design for a few seconds and try again.
Care Instructions
Wash and dry your t-shirt prior to apply your vinyl design. Do NOT use fabric softener.
Never apply vinyl over zippers, seams, or anything else that’s bumpy… stick with areas of fabric that are smooth and flat.
Wait at least 24 hours before washing your shirt — and then wash it only in cool water without fabric softener.
Flip your shirt inside out when washing and drying it to preserve the life of your design.
Tumble dry low or lay flat to dry.
NEVER use an iron directly on the vinyl – it will melt.
And there you go…you’re an expert Cricut shirt maker now.
We cannot wait to see the shirts you make! Share your design with us using #picturethemagic for a chance to be featured on our Instagram.
Want More Projects?
Ready to make another Iron-On Project?
Here are some of our favorite Disney Iron-On Vinyl Projects to inspire you!
- Glitter Vinyl Disney Bag from Crafting in the Rain
- Four Star Wars Inspired Iron-On Shirt Designs from It Happens In a Blink
- DIY Minnie Mouse Knee Patch Pants And Shirt by Girl Loves Glam
- Full list of Disney Cricut projects to do with kids
Pin for Later
